How to Upload Assets in Adobe Muse
Upload assets
To add new assets to piece of work with, upload a few assets from your local file system.
You lot tin can utilize the following methods to upload one or more avails or a folder containing assets:
- Elevate assets or folders on the user interface and follow the on-screen instructions.
- Click Add together Assets pick from the toolbar and add some files to the upload dialog.
You lot can use any of these methods to upload assets afterwards creating a binder. To create an empty folder, click Create Folder from the toolbar. While Assets Essentials offers a powerful, full-text search functionality, you lot can besides utilize folders to organize your avails better.
Once y'all have selected the files, you go a confirmation dialog to add more files or to remove already selected files. To add more than files to a choice, click Browse and the select Scan files or Browse folders. Add more than files or folders from the same or from a different folder.
Once all files are queued, click Upload.
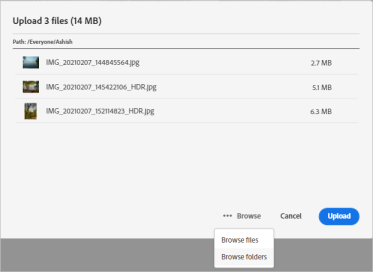
Effigy: Earlier you upload the selected assets, you tin can add or remove assets from the queue.
Circumspection
Apply assets that practise not have whitespace in the file names. The replies to comments do not piece of work for such assets.
View upload progress and status
When you lot upload many assets or nested folders to Assets Essentials, some assets can fail to upload for various reasons such as duplicate asset and network issues.
To runway the upload progress, click Upload Progress option on the toolbar. A panel displays the upload progress of all assets.
To view a subset of avails based on the upload progress or condition, use the filter in the Upload Progress sidebar. The various filters are to brandish all avails, completed uploads, in-progress uploads, queued assets to be uploaded, paused uploads, duplicate assets, and assets that failed to upload.

Figure: Filter the assets that you lot attempted to upload based on their upload status or upload progress.
Immediately after the assets are uploaded, Assets Essentials processes the assets to generate thumbnail and procedure metadata. For many assets, the processing takes some time. If do not see a thumbnail and see a processing message on the placeholder thumbnail, check the folder again after a few minutes. During processing, amongst other things, Avails Essentials generates the renditions, adds smart tags, and indexes the nugget details for search.

Figure: Uploaded assets display processing on the tile these are processed.
Nugget renditions
Assets Essentials processes the uploaded assets in near real fourth dimension and for many supported file types, it generates renditions. Created for images, the renditions are resized versions of the uploaded paradigm. You tin can download non just the asset but also the renditions to use an advisable version. Yous can view all the renditions of an asset when you preview an asset.

Effigy: View and download the renditions.
Manage failed uploads
If upload of a supported asset fails for some reason, click Retry from the Upload Progress pane.

Effigy: Retry if a supported file fails to upload for some reason.
If you endeavour to upload indistinguishable avails, the assets are not uploaded until you explicitly confirm the upload. At kickoff, the duplicate assets are marked equally failed uploads. To resolve, you can just create a version, delete and replace the existing avails, or create a duplicate copy past renaming the asset. You lot can resolve such failures one asset at a fourth dimension or do it in bulk for all failed duplicates in one go.

Figure: For duplicate avails that fail to upload by default, resolve the effect i asset at a time.
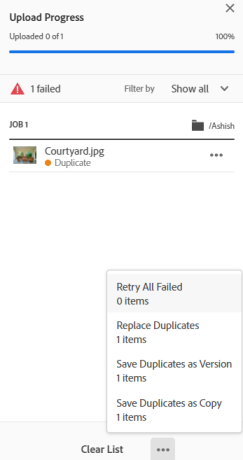
Figure: For duplicate assets that fail to upload past default, resolve problems for all assets at once.
Delete avails or folders
Users can delete private assets or folders that are no longer required. To delete an asset or a binder do one of the following:
-
Use the pick available on an nugget's or a folder'south thumbnail.

Figure: Actions for files and folders are available on the asset or folder tile.
-
Select an nugget or a folder and click Delete
 in the toolbar.
grossmanhaideatel.blogspot.com
Source: https://experienceleague.adobe.com/docs/experience-manager-assets-essentials/help/add-delete.html%3Flang%3Den
0 Response to "How to Upload Assets in Adobe Muse"
Post a Comment